
前言:经过近两年的开发,目前 Windows Subsystem For Linux(以下简称 WSL)已经十分完善,如今记录WSL下的Ubuntu18.04配置过程。使用Hpyer+zsh+ohmyzsh以及插件来达到美观,实用的目的。
Hyper
在Microsoft Store里安装好Ubuntu18.04后,首先要配置好Hyper终端,之后所有的操作都在Hyper内进行。

打开Hyper(参考:Hyper™ 基于JS/HTML/CSS的终端(Terminal)指南),按ctrl+,,找到对应行并更改成如下内容
updateChannel: 'canary',
shell: 'C:\\Windows\\System32\\cmd.exe',
shellArgs: ['--login', '-i', '/c wsl'],
ubuntu
改科大源
Ubuntu默认的源服务器在国外,速度慢,需要vim打开下面这个文件:
vim /etc/apt/sources.list按i,在首行添加如下内容:
deb https://mirrors.ustc.edu.cn/ubuntu/ bionic main restricted universe multiverse
deb-src https://mirrors.ustc.edu.cn/ubuntu/ bionic main restricted universe multiverse
deb https://mirrors.ustc.edu.cn/ubuntu/ bionic-updates main restricted universe multiverse
deb-src https://mirrors.ustc.edu.cn/ubuntu/ bionic-updates main restricted universe multiverse
deb https://mirrors.ustc.edu.cn/ubuntu/ bionic-backports main restricted universe multiverse
deb-src https://mirrors.ustc.edu.cn/ubuntu/ bionic-backports main restricted universe multiverse
deb https://mirrors.ustc.edu.cn/ubuntu/ bionic-security main restricted universe multiverse
deb-src https://mirrors.ustc.edu.cn/ubuntu/ bionic-security main restricted universe multiverse
deb https://mirrors.ustc.edu.cn/ubuntu/ bionic-proposed main restricted universe multiverse
deb-src https://mirrors.ustc.edu.cn/ubuntu/ bionic-proposed main restricted universe multiverse输入:wq保存,再
apt-get update
apt-get upgrade
Git全局代理
之后会经常使用到git,但是在国内git太慢,需要配置一下代理(请先本地保证ss等有开放http代理端口,并且为1080,如果不懂,“Git全局代理”这一段跳过)
git config --global http.proxy http://127.0.0.1:1080
git config --global https.proxy https://127.0.0.1:1080
或者仅代理github,这样使用国内的git时速度不会变慢:
git config --global http.http://github.com.proxy http://127.0.0.1:1080
git config --global https.https://github.com.proxy https://127.0.0.1:1080
安装ZSH+Oh My ZSH!
sudo apt-get install zsh -y
sh -c "$(curl -fsSL https://raw.githubusercontent.com/robbyrussell/oh-my-zsh/master/tools/install.sh)"
chsh -s /bin/zsh
然后让系统默认shell为zsh
vim ~/.bashrc中加入
if [ -t 1 ]; then
exec zsh
fi或者加入
bash -c zsh安装screenfetch
实现功能如下
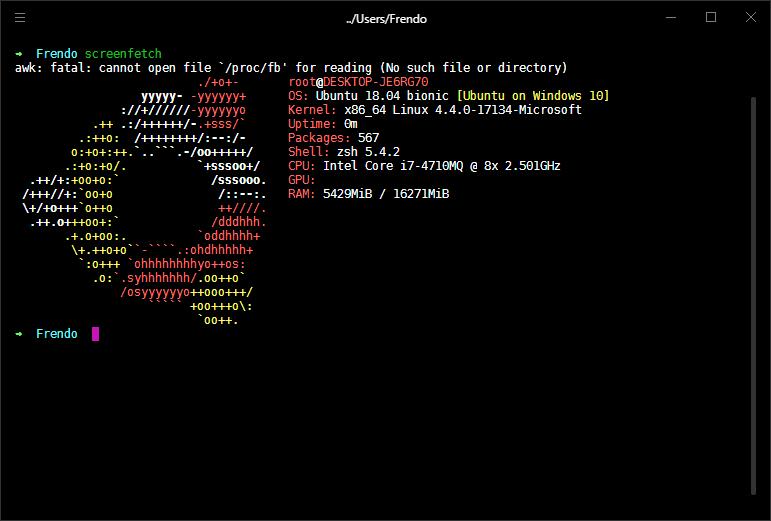
apt-get install -y screenfetch安装zsh高亮
让命令行高亮的插件
git clone https://github.com/zsh-users/zsh-syntax-highlighting.git ${ZSH_CUSTOM:-~/.oh-my-zsh/custom}/plugins/zsh-syntax-highlightingActivate the plugin in ~/.zshrc:
plugins=( [plugins...] zsh-syntax-highlighting)source ~/.zshrcvim显示行号+自动缩进
vim /etc/vim/vimrcset nu
set autoindent安装zsh-autosuggestions语法历史记录插件
自动补全之前输入过的命令,按→键补全
git clone https://github.com/zsh-users/zsh-autosuggestions ${ZSH_CUSTOM:-~/.oh-my-zsh/custom}/plugins/zsh-autosuggestionsActivate the plugin in ~/.zshrc:
plugins=( [plugins...] zsh-autosuggestions)source ~/.zshrc参考
HOW TO | 让自己的终端漂亮得不像实力派
My WSL Setup for Development
How to Install Zsh and Oh My Zsh on Windows 10
Ubuntu 16.04下安装zsh和oh-my-zsh
Windows10安装WSL(Ubuntu子系统)及YouCompleteMe
--随缘箭·版权所有:WSL + Ubuntu + ZSH + Hyper终端--


可惜的是不能改透明度除了mac
shellArgs: [‘–login’, ‘-i’, ‘/c wsl’],
好像要改成
shellArgs: [‘–login’, ‘-i’, ‘\/c wsl’],
很酷的文章 😆
你好,请问你用wsl安装了oh my zsh 以后 终端卡吗?用vim会卡吗?
lz用zsh的时候不会光标错位吗?我的hyper+oh_my_zsh打字打着打着光标就错位了,bash没问题