Stable Difussion 是非常火的生成图片的模型。网上有许多的教程和一键包,本文着重于介绍在 WSL2 下的 Conda 环境安装 Automatic1111(简称Auto1111/A1111)版本 WebUI。这么做的好处如下:WSL 和 Windows 隔离不改 Win 下的各种驱动设置(不影响游戏)、Conda 防止依赖版本错乱、Conde 比 Venv 效率高、管理/重装/更新方便。
TL;DR
本文主要是为了环境干净,方便以后玩其他的模型/项目。最省事建议直接下载B站秋叶大佬的 windows 一键包(链接)
基本环境
系统:Windows 11 22H2
CPU:Intel i7-12700H
显卡:GeForce RTX 4060 Laptop(8G)
内存:DDR4 3200 32G * 2
安装
完整代码
# Install WSL
wsl --install

# Install Ubuntu to WSL
wsl --install Ubuntu

# 请注意:安装Linux失败,错误代码:0x80370114"。这可能意味着在Windows上未启用某些功能。要解决此问题,请以管理员身份启动PowerShell,并使用以下两个命令启用必要的功能:
# dism.exe /online /enable-feature /featurename:Microsoft-Windows-Subsystem-Linux /all /norestart
# dism.exe /online /enable-feature /featurename:VirtualMachinePlatform /all /norestart

# Set installed Ubuntu to default if needed. You could need this if you have multiple distros installed on WSL.
# wsl --set-default Ubuntu

# Open PowerShell and launch Ubuntu using this command, or launch it from the drop-down arrow near the tabs in the PowerShell window. Alternatively, you can also launch it from the Windows Start menu, it should be listed there after it has been installed.
wsl -d ubuntu

# Navigate to your Ubuntu home folder, regardless of your current location, use the command 'cd ~'.
cd ~

# Download Anaconda
wget https://repo.continuum.io/archive/Anaconda3-2022.10-Linux-x86_64.sh

# Install Anaconda
bash Anaconda3-2022.10-Linux-x86_64.sh

# Restart Terminal and start it again
exit

# Clone Stable Diffusion Web UI Repo
git clone https://github.com/AUTOMATIC1111/stable-diffusion-webui.git

# Create conda environment (Run this command in the "stable-diffusion-webui" folder)
conda env create -f environment-wsl2.yaml

# Activate conda environment
conda activate automatic

# Create new repositories folder under stable-diffusion-webui
mkdir repositories

# Clone more repositories
git clone https://github.com/CompVis/stable-diffusion.git repositories/stable-diffusion
git clone https://github.com/CompVis/taming-transformers.git repositories/taming-transformers
git clone https://github.com/sczhou/CodeFormer.git repositories/CodeFormer
git clone https://github.com/salesforce/BLIP.git repositories/BLIP

# Install pip packages
pip install transformers diffusers invisible-watermark --prefer-binary
pip install git+https://github.com/crowsonkb/k-diffusion.git --prefer-binary
pip install git+https://github.com/TencentARC/GFPGAN.git --prefer-binary
pip install -r repositories/CodeFormer/requirements.txt --prefer-binary
pip install -r requirements.txt --prefer-binary
pip install -U numpy --prefer-binary
pip install opencv-python-headless

# Install Cuda
conda install cuda -c nvidia

# Download/copy model file to "stable-diffusion-webui/models/Stable-diffusion" folder

# Add WSL to path
echo 'export LD_LIBRARY_PATH=/usr/lib/wsl/lib:$LD_LIBRARY_PATH' >> ~/.bashrc

# Exit and start Ubuntu terminal again
exit

# To navigate to the "stable-diffusion-webui" directory within your home directory, use this command
cd ~/stable-diffusion-webui

# And always remember to activate Conda environment before launch Stable Diffusion Web UI
conda activate automatic

# Start Web UI
python launch.py
分步拆解
跟着命令来走即可。
打开 PowerShell,安装 WSL:

wsl --install安装 Ubuntu(默认 22.04):
wsl --install Ubuntu登录到 Ubuntu:
wsl -d ubuntu进入到 Ubuntu 根目录:
cd ~配置代理 & 换源:
#配置代理
export HOSTIP=$(cat /etc/resolv.conf | grep "nameserver" | cut -f 2 -d " ")
export http_proxy="http://$HOSTIP:7890"
export https_proxy="https://$HOSTIP:7890"
export all_proxy="http://$HOSTIP:7890"
export ALL_PROXY="http://$HOSTIP:7890"

#换 pip 源
python -m pip install --upgrade pip
pip config set global.index-url https://pypi.tuna.tsinghua.edu.cn/simple

# Ubuntu 换源
sudo sed -i 's@//.*archive.ubuntu.com@//mirrors.ustc.edu.cn@g' /etc/apt/sources.list
下载并安装 Anaconda 或 Miniconda:
wget https://repo.anaconda.com/archive/Anaconda3-2023.03-1-Linux-x86_64.sh
bash Anaconda3-2023.03-1-Linux-x86_64.sh
重启:
exit克隆 WebUI的仓库:
git clone https://github.com/AUTOMATIC1111/stable-diffusion-webui.git进入克隆好的仓库文件夹:
cd stable-diffusion-webui利用开源项目内的yaml文件配置conda环境:
conda env create -f environment-wsl2.yaml配置好了,直接进入对应的conda环境:
conda activate automatic在 stable-diffusion-webui 文件夹内新建一个文件夹(A1111项目还会引用并克隆几个其他的开源项目,我们先建好文件夹手动克隆):
mkdir repositories# Clone more repositories
git clone https://github.com/CompVis/stable-diffusion.git repositories/stable-diffusion
git clone https://github.com/CompVis/taming-transformers.git repositories/taming-transformers
git clone https://github.com/sczhou/CodeFormer.git repositories/CodeFormer
git clone https://github.com/salesforce/BLIP.git repositories/BLIP安装所需要的 Pip 环境:
pip install transformers diffusers invisible-watermark --prefer-binary
pip install git+https://github.com/crowsonkb/k-diffusion.git --prefer-binary
pip install git+https://github.com/TencentARC/GFPGAN.git --prefer-binary
pip install -r repositories/CodeFormer/requirements.txt --prefer-binary
pip install -r requirements.txt --prefer-binary
pip install -U numpy --prefer-binary
pip install opencv-python-headless
安装 CUDA:
conda install cuda -c nvidia下载模型:
v1-5-pruned-emaonly.ckpt – 4.27GB
v1-5-pruned.ckpt – 7.7GB
更多模型:
CivitAI
把Cuda的文件Path写入环境变量:
# 执行第一条
echo 'export LD_LIBRARY_PATH=/usr/lib/wsl/lib:$LD_LIBRARY_PATH' >> ~/.bashrc
#(选)如果你自己手动改成了zsh,则执行这一条
echo 'export LD_LIBRARY_PATH=/usr/lib/wsl/lib:$LD_LIBRARY_PATH' >> ~/.zshrcexit进入 webui 目录并启动相关程序(未来使用时,每次都重复这三行代码即可):

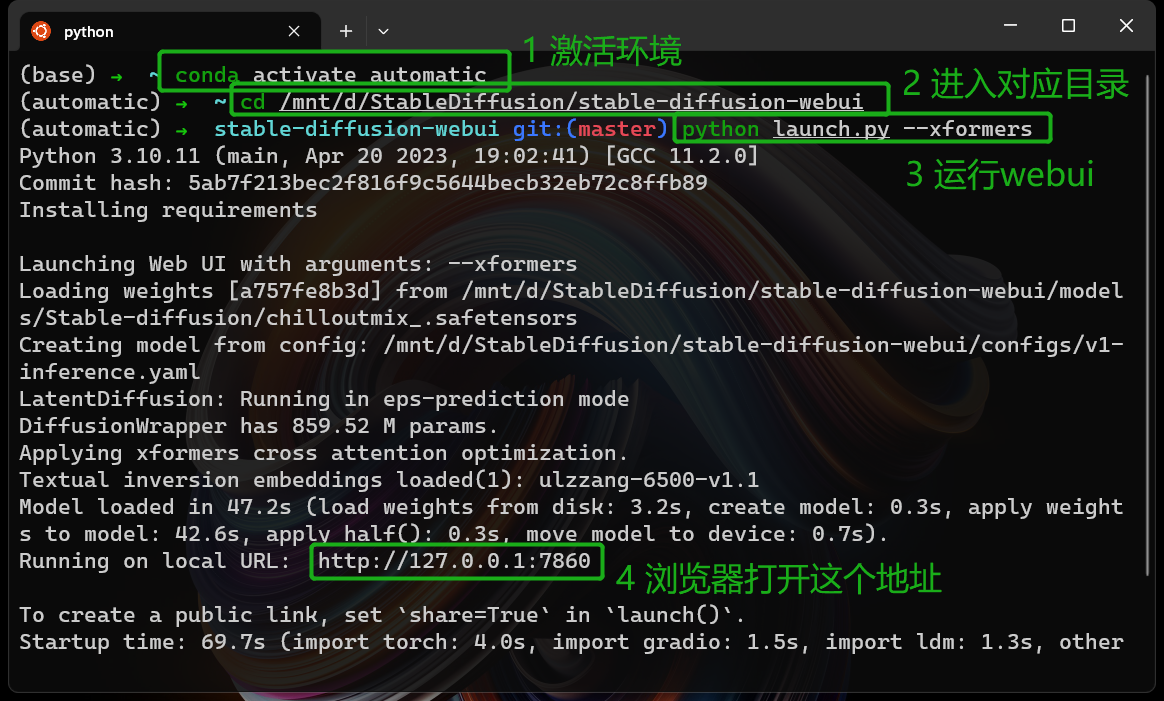
cd ~/stable-diffusion-webuiconda activate automaticpython launch.py --xformers更新
未来如果有更新需求,现进入到webui的主目录,再:
git pull问题解决
Could not load library libcudnn_cnn_infer.so.8.错误
sudo apt install nvidia-cudnn参考
https://www.zhihu.com/column/c_1563238376853258240
https://sakari.niittymaa.com/blog_install-stable-diffusion-web-ui-using-wsl-and-anaconda
https://blog.csdn.net/weixin_42236469/article/details/128054728


😈